Once you’ve got everything setup, plugins installed, customized, content input, and you’re pretty much ready to launch your new Bootplate-powered WordPress website, here are a few optimization tricks to make sure your new site is as wicked-fast as it can be.
Performance Settings new in v1.2
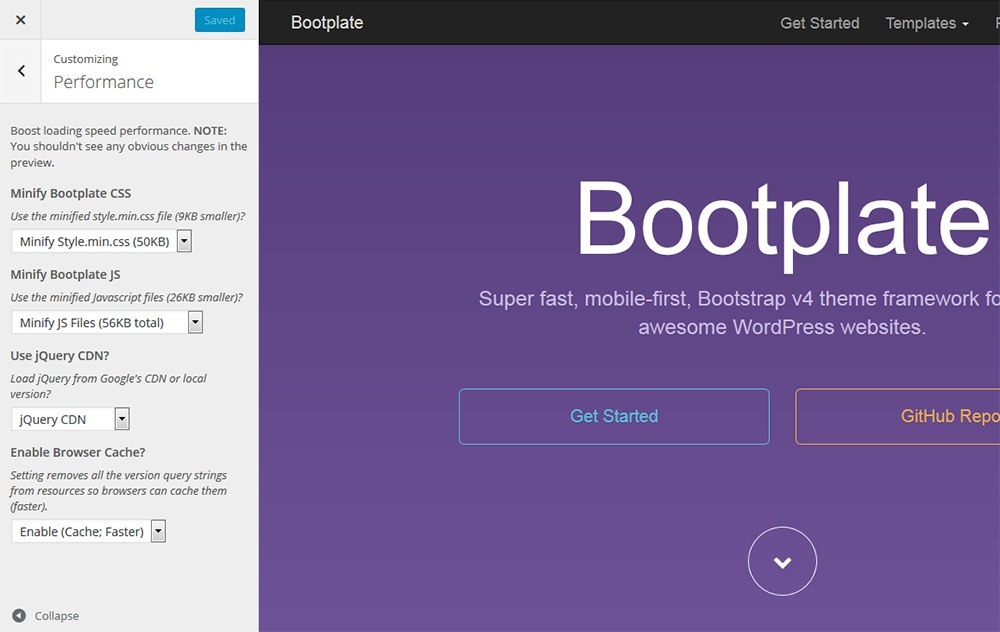
Head over to Appearance >> Customize from the WordPress admin. Under the “General Settings” section, you’ll see Performance. Click that to reveal the Performance optimization settings available as of v1.2 of Bootplate.

Minify Bootplate CSS
This option loads the minified version(s) of all built-in Bootplate stylesheets. Even the unminified styles are semi-minified, but you’ll save 9KB on every page load by setting this option to “Minify Style.min.css.”
Minify Bootplate JS
This option loads the minified version(s) of all built-in Bootplate Javascript resources (mostly plugins.js and main.js). plugins.js includes scripts that are already minified, but the minified version re-minifys them together saving you a total of 26KB on every page load by setting this option to “Minify JS Files.”
Use jQuery CDN
This is enabled by default, because why wouldn’t you want to use the world’s most popular CDN for jQuery?! But, it’s an option. Choose “Local jQuery” to load the minified version of jQuery included in Bootplate (or the WordPress core).
Enable Browser Cache
For reasons we don’t totally understand, WordPress likes to add version numbers as query strings to all enqueued resources (Javascript and CSS). Presumably, it’s so that you’re receiving the latest version of these as you update, upgrade, and continue to develop your website.
However, they block the browser from caching these resources. It’s a lot faster for users’ browsers to cache these resources once the site is in a production setting than to re-download the same files over and over again.
Choose the Enable (Cache; Faster) option to remove ALL version number query strings from enqueued resources.
You won’t see a difference in the way your site looks, but “view source” before and after you’ve edited these settings and you’ll see a noticeable difference in speed and simplicity.
Got an idea for more performance improvements? Let us know on GitHub or check out the blog post that inspired this new feature.
Manual Style Minification
As of Bootplate v1.2, the theme will check for the existence of your child theme’s stylesheet in a minified form. PHP has a tendency to cache the answer to “if file exists”, so we held off telling you about this until the very end.
To use this feature (totally optional), copy all the CSS except for the comments at the top from your child theme’s style.css file into a minification application like: https://cssminifier.com
Then, copy the minified CSS output into a new file called style.min.css in the same location as your other style.css file.
PHP will/should detect that the file style.min.css now exists and use it. It’ll also cache that and refer to style.min.css and ignore style.css in the future.
If you make changes to your style.css file, you’ll want to re-minify the code and overwrite the output into the style.min.css file.
Combine and Minify Automatically
Your main style.css file is not the whole picture. You should also look into combining and minifying ALL the JavaScript and CSS your site is using. That’s possible to do manually, but who has the time.
We highly recommend the Better WordPress Minify plugin. It’ll handle 99% of this for you automatically AND it’s been well-tested with the Bootplate theme framework.
You can also use W3Total Cache, but we find this plugin can be a real pain to uninstall if you decide you don’t want it.
Add Expires Header
This is a little outside of WordPress, but we get questions all the time on this–usually because of a Google Page Speed warning that goes something like:
Setting an expiry date or a maximum age in the HTTP headers for static resources instructs the browser to load previously downloaded resources from local disk rather than over the network.
Well, that sounds pretty technical and it is. The good news is that it’s easy to fix. Basically, you just need to add some code to your .htaccess file in the root of your WordPress installation. Open that file in Notepad (or whatever) and add the following code AFTER the WordPress stuff, ending: # END WordPress.
.htaccess file like “htaccess-backup.txt” before you make any changes to the real one and upload it.We could go into all this stuff, but it’s a little too technical for a documentation site. There’s more information on the Google Developers site.
Test, Test, Test
You can try and optimize until your blue in the face, but at some point, you’ll need a third-party to review your code to find where you could improve even more. Here are two testing applications we like: